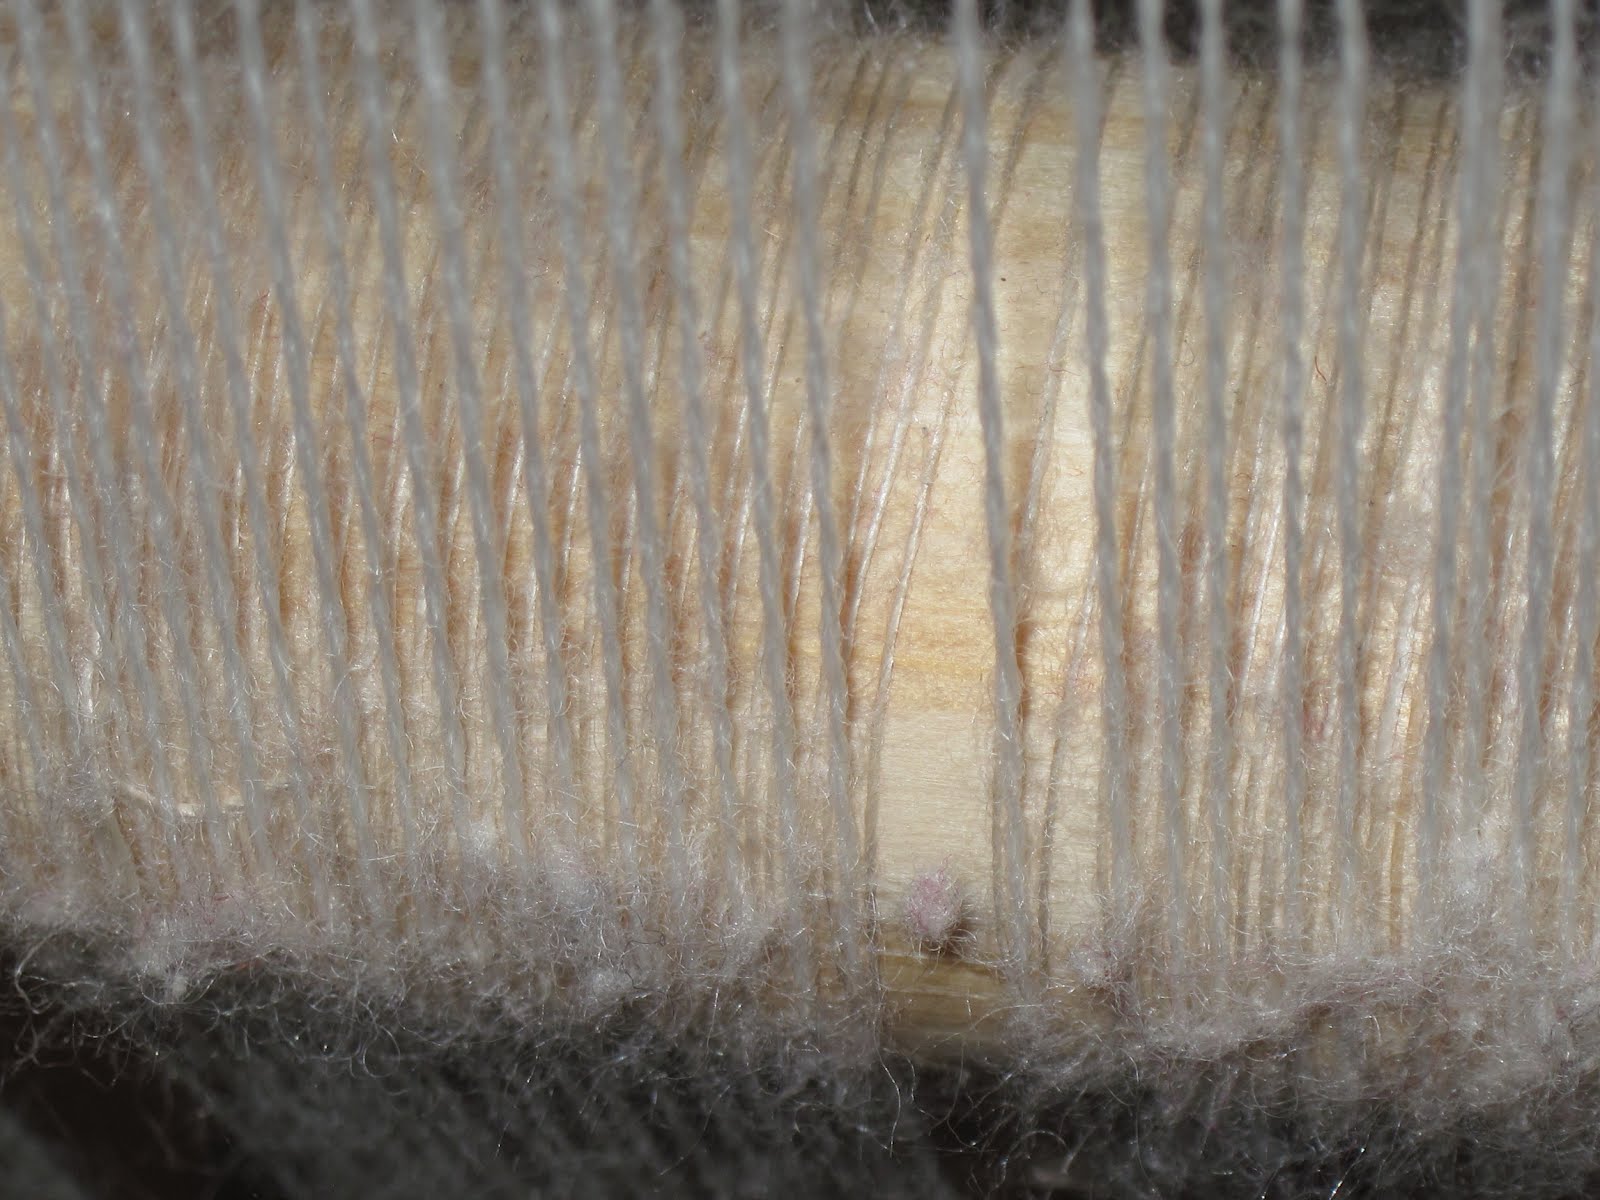
After 6" of weaving, it was time to make the first turn of the cloth beam. At first 6" was just an arbitrary marker, the goal I set for myself to weave before turning the beam. But then I looked at this.
Here you can see the buildup of fuzz on the shed rod. The warp is casting off fibers as it moves up and down in the shed rod lacing. Because this is a very nicely spun worsted yarn there are not a lot of loose fibers to shed, but it's still happening. Partly that's because of the way I beat. When I weave on the warp-weighted loom I don't actually "beat" the weft, I simply put the edge of the beater against the fell and press upward evenly until I feel that I am lifting the weight of the loom weights. Thus I make gravity and the loom weights work for me rather than expending all that whomp-whomp-whomp upward-beating energy that feels good to do but doesn't have as even and satisfactory a result--at least, not in my experience. YMMV. But my method does shift the front shed's worth of warp up and down slightly through its lacing, which encourages this slight fraying and build-up.
So it seems to me that it would be a good idea to turn the cloth beam rather frequently, in order to give each section of the warp threads as short a time as possible in that constraining position against the shed rod. Although I didn't take a photo of it, I also noticed some slight fuzz buildup on the heddles. I expect that frequent turning will save the warp threads from wear in that position also.
This is a shot of the warp after six inches had been woven but before any turning of the cloth beam had taken place.
This is how the warp looks after the first turning. It was a quarter-turn of the cloth beam (which is square in cross-section). Next time I think I'll try a half-turn.
One thing I have noticed about this project: there isn't a lot of fibery fluff building up under the loom the way there usually is when I weave on a warp-weighted loom. I think that's probably due, again, to the superior quality of this yarn. So far, the only thing we've had to vacuum out from under the loom has been cat hair. Mercifully, my cat is entirely disinterested in the enticingly dangled weights of this project, but somehow his hair gets under the loom anyway.
Showing posts with label loom. Show all posts
31 March 2012
11 March 2012
As promised
Here is a photo of the whole loom. It's in a location that's a little tight, a narrow dining area, so it's hard to get far enough away from the loom to get a really good shot. But you can get an idea of how things look now. You can see I have the two heddle rods in use. (To give you some idea of scale: each of those rods is four feet long.) This arrangement is a little bit fiddly for one person to operate, and I'm going to have to keep an eye out for it. But so far it's working all right.
That white blob just above the heddle rod on the left side of the warp is the penion, the shuttle. It is a cedar stick (a cut-down arrow shaft) with a very large cop of yarn wound onto it. It is resting atop the string heddles between the two sheds of the web.
Here is a closer view of the penion. It is 24" long. I enjoyed sticking it into this spot because it made the loom look more like the ones on the Amasis lekythos.
The first four wefts are purple-dyed wool. They're the reason the shadow under the cloth beam looks so deep; that's actually part of the cloth you're seeing and not a shadow. I wanted them in there because there's a textile from the Kerameikos at Athens which has a tiny purple stripe right under the starting border. I didn't have any trouble selling this idea to ὁ πάτρων (Il Patron)! You can see the rest of the ball of purple wool on the ground under the loom; I haven't detached it yet.
That little dark spot at the center top of the first photo is a glass bead in the shape of an owl that I hung from the reinforcing bar (which is out of view at the top of the loom). You've heard of computer totems, the little toys and figurines people stick atop their computers and monitors? Bubo there is my loom totem.
That white blob just above the heddle rod on the left side of the warp is the penion, the shuttle. It is a cedar stick (a cut-down arrow shaft) with a very large cop of yarn wound onto it. It is resting atop the string heddles between the two sheds of the web.
Here is a closer view of the penion. It is 24" long. I enjoyed sticking it into this spot because it made the loom look more like the ones on the Amasis lekythos.
The first four wefts are purple-dyed wool. They're the reason the shadow under the cloth beam looks so deep; that's actually part of the cloth you're seeing and not a shadow. I wanted them in there because there's a textile from the Kerameikos at Athens which has a tiny purple stripe right under the starting border. I didn't have any trouble selling this idea to ὁ πάτρων (Il Patron)! You can see the rest of the ball of purple wool on the ground under the loom; I haven't detached it yet.
That little dark spot at the center top of the first photo is a glass bead in the shape of an owl that I hung from the reinforcing bar (which is out of view at the top of the loom). You've heard of computer totems, the little toys and figurines people stick atop their computers and monitors? Bubo there is my loom totem.
05 March 2012
Still slogging away....
Half the heddles are knit. I have a lot of obligations in the next 24 hours or so, so I'm not sure I'm going to get much more progress made before Wednesday. But I'm happy with my progress so far. The linen I chose to knit the heddles with is cooperating well, and the heddles are mostly very even. When you have to knit more than 800 heddles, you want a lot of consistency.
I am using the split heddle rod approach. Instead of one long heddle rod that goes across the whole six feet of warp, I'm using two, one on each half of the warp. I'm a little dubious about this approach since it's only a theoretical rather than a documentable approach. Still, it makes more sense than trying to operate a two-person sized warp and heddle rod all by myself without brackets, heddle rod supports, or anything else to hold the rod. From my experience weaving tabby on the Icelandic loom, though, I know it is possible to operate the heddle rod of a narrow warp one-handed while using the sword to secure the shed. I have tested and yes, I can move the current three-foot heddle rod one-handed. What a relief! I was afraid there'd be too much counterweight on the rod for it to be comfortable.
The fiddly part will be at the center of the warp, where the ends of the two heddle rods might overlap or bash one another. I'm solving that by making the dexter side's rod higher than the sinister side's rod.
Once the loom is entirely ready to weave, I'll post a full photo.
I am using the split heddle rod approach. Instead of one long heddle rod that goes across the whole six feet of warp, I'm using two, one on each half of the warp. I'm a little dubious about this approach since it's only a theoretical rather than a documentable approach. Still, it makes more sense than trying to operate a two-person sized warp and heddle rod all by myself without brackets, heddle rod supports, or anything else to hold the rod. From my experience weaving tabby on the Icelandic loom, though, I know it is possible to operate the heddle rod of a narrow warp one-handed while using the sword to secure the shed. I have tested and yes, I can move the current three-foot heddle rod one-handed. What a relief! I was afraid there'd be too much counterweight on the rod for it to be comfortable.
The fiddly part will be at the center of the warp, where the ends of the two heddle rods might overlap or bash one another. I'm solving that by making the dexter side's rod higher than the sinister side's rod.
Once the loom is entirely ready to weave, I'll post a full photo.
20 February 2012
Safely secured
This is the hard part of what I did yesterday. Here you see the header band laced through every four threads to a stiffening bar. The bar is resting on top of the shed rod, just for convenience of photographing.
Normally I use a dowel as my stiffening rod. But with a warp six feet wide, it made more economic sense to use lumber than look for a dowel that long, and so this time I have a stiffening bar. This piece of lumber is a 1x2, which means it actually measures .75" by 1.5".
Originally I began using a stiffening rod on the warp-weighted loom for two reasons. First, it gave me better control over the header band than I had simply by stitching it to the holes of my Icelandic style loom's cloth beam. The holes in such a beam are fairly widely spaced. The one time I tried to attach a warp only through those holes, the header band scalloped so alarmingly (more than 3") after I weighted it that I decided that must not have been how it should be done. At the time I hadn't seen any museums' attempts to solve this problem, so I was interested to find out later that other people working with the warp-weighted loom had solved it in a way similar to mine, i.e., with the addition of a stiffening bar.
I also intended my warps to be removable from the loom. The Icelandic loom was built as a teaching and demo device. I wanted to be able to warp it and then, if necessary, remove my working warp entire in order to take the loom someplace and warp it with a teaching warp. By putting the header band on a stiffening rod, I found I could easily remove and roll up an entire warp, weights, chained spacers, heddle rods, skilskaft and all, and set it aside for later if necessary.
I don't intend this current warp, or indeed this loom, to be portable. However, I am so sold on the utility of the stiffening rod that I cannot imagine working a project without one.
It was, therefore, quite a delight to discover in the archaeological record an example of a header band that still retained stitching believed by the examiner to represent lacing to a stiffening rod.
09 February 2012
Loom validation
Due to the requirements of this project, Greg and I knew we'd need a very wide loom rather than the more narrow ones shown in most of the ancient Greek depictions. Accordingly, we focused most closely on the depictions of the looms on the Amasis lekythos and Chiusi 1831. Although I believed the loom to be completely justifiable at the width we decided, I couldn't specifically document it the way I have been able to document so many other types of loom and textile projects. That made me just a little bit uneasy, not knowing exactly whether or where to draw that research line that means "beyond this is artistic license that might be flawed." But we decided to let the product of the loom tell us what the loom should be like. Since then I have tried to live with the niggling little doubts I retained.
That changed yesterday, after I received my copy of a book that's extremely relevant to the project. While the article I wanted the book for was disappointing in its general nature, other articles were surprisingly useful. One of them detailed an archaeological site from the correct culture and period where a gynaikon (women's quarters) portion of a house was found, including a row of loomweights between a pair of postholes. The postholes were for the histopodes (uprights) of a loom. It is possible to know something about the width of the loom from this find.
I was delighted to discover that the loom I am working on is right in the zone!
I always enjoy it when I find something after the fact to validate a project decision I've made. While it is always better to know before the fact rather than after, it's still better to know than not to know.
That changed yesterday, after I received my copy of a book that's extremely relevant to the project. While the article I wanted the book for was disappointing in its general nature, other articles were surprisingly useful. One of them detailed an archaeological site from the correct culture and period where a gynaikon (women's quarters) portion of a house was found, including a row of loomweights between a pair of postholes. The postholes were for the histopodes (uprights) of a loom. It is possible to know something about the width of the loom from this find.
I was delighted to discover that the loom I am working on is right in the zone!
I always enjoy it when I find something after the fact to validate a project decision I've made. While it is always better to know before the fact rather than after, it's still better to know than not to know.
06 February 2012
On schedule
Taking a break from warping. I've got the loom up, the warping rig set up, and three inches of header band woven. Only 67 more to go!
I had a little difficulty with the first inch of header band: I was so worried about beating too hard that I wound up beating too loosely. That first inch is over an inch and a quarter! But by the second inch I'd settled down into an effortless gauge.
It's tough warping by yourself when warping calls for transporting weft loops longer than 6' onto a peg. This is one part of the process that, no matter which historic practice I'm researching, is usually in the dark. I don't know how "they" did it, whether "they" is the historic Scandinavians and north Europeans I've been studying or the ancient Greeks whom I'm studying now. Hoffmann's work in The Warp-Weighted Loom, documenting how the Sami weavers wove header bands for their grener in the first part of the 20th century, is very valuable, but I'm not convinced that it represents a universal technique or even one that's relevant to studies of weaving 2300 years previous to it. Anyway, I long ago worked out a method for warping my Iceland/Greenland style loom using an upright tablet weaving loom (repro of the one found in the Oseberg burial mound) and an assistant. But right now I don't have an assistant, and I don't even have that loom any more. Instead, I'm using the equivalent of a warping board: several pegs across which the weft loops zigzag. I've already learned just how far I have to travel with each loop before bringing it back to begin wrapping it around the pegs. Fortunately, I enjoy such rote, repetitious movements for the quality assurance I think they produce. :-)
I'm using a small rigid heddle for the header band warps, and a small frame loom to manage the unwoven warp.
I'm continuing to use the method for separating and maintaining the cross that I learned in Hoffman. I find that pre-counting the threads now, during the warping, makes it easier to put equal numbers of threads on the weights later on. If I had weights that were not approximately all the same weight, that'd be a different problem. But this is the problem I have always had, and this is how I have learned to solve it. Accordingly, I am making a separate slip-knotted bundle of each inch of warp.
I need to put something under my band weaving area. Right now I'm working on the dining room table, which happens to be covered with a clean white cloth. I can scarcely see all the white yarn against the white tablecloth; I need a backdrop of some sort to help these old eyes.
Well, that's enough sitting. Back to warping!
I had a little difficulty with the first inch of header band: I was so worried about beating too hard that I wound up beating too loosely. That first inch is over an inch and a quarter! But by the second inch I'd settled down into an effortless gauge.
It's tough warping by yourself when warping calls for transporting weft loops longer than 6' onto a peg. This is one part of the process that, no matter which historic practice I'm researching, is usually in the dark. I don't know how "they" did it, whether "they" is the historic Scandinavians and north Europeans I've been studying or the ancient Greeks whom I'm studying now. Hoffmann's work in The Warp-Weighted Loom, documenting how the Sami weavers wove header bands for their grener in the first part of the 20th century, is very valuable, but I'm not convinced that it represents a universal technique or even one that's relevant to studies of weaving 2300 years previous to it. Anyway, I long ago worked out a method for warping my Iceland/Greenland style loom using an upright tablet weaving loom (repro of the one found in the Oseberg burial mound) and an assistant. But right now I don't have an assistant, and I don't even have that loom any more. Instead, I'm using the equivalent of a warping board: several pegs across which the weft loops zigzag. I've already learned just how far I have to travel with each loop before bringing it back to begin wrapping it around the pegs. Fortunately, I enjoy such rote, repetitious movements for the quality assurance I think they produce. :-)
I'm using a small rigid heddle for the header band warps, and a small frame loom to manage the unwoven warp.
I'm continuing to use the method for separating and maintaining the cross that I learned in Hoffman. I find that pre-counting the threads now, during the warping, makes it easier to put equal numbers of threads on the weights later on. If I had weights that were not approximately all the same weight, that'd be a different problem. But this is the problem I have always had, and this is how I have learned to solve it. Accordingly, I am making a separate slip-knotted bundle of each inch of warp.
I need to put something under my band weaving area. Right now I'm working on the dining room table, which happens to be covered with a clean white cloth. I can scarcely see all the white yarn against the white tablecloth; I need a backdrop of some sort to help these old eyes.
Well, that's enough sitting. Back to warping!
05 February 2012
The loom is built!
It's much bigger in reality than it was in my mind, or on top of the car when we were bringing the lumber home from the store. But the ancient Greek style loom is mostly put together.
I spent part of today making a test warp to check gauge. I need to have some idea of thread count so I can make solid calculations of how much yarn I'm going to need. I discovered to my surprise that my natural tendency is to beat the yarn in the header band much more closely than is recommended for tabby setts in that yarn. But I persevered, fighting my usual tendency to beat really hard, and eventually got down to a workable thread count.
Tomorrow I get to finish putting the loom together and make a very long header band. Well, maybe start making the header band. I'm really not sure how long it's going to take me to make a header band for a project this wide, using techniques I haven't used often enough to be comfortable doing. I wish I could document having a tablet woven header band, but I can't, more's the pity. So I learn a new thing; that's part of the point of projects like this, right?
I spent part of today making a test warp to check gauge. I need to have some idea of thread count so I can make solid calculations of how much yarn I'm going to need. I discovered to my surprise that my natural tendency is to beat the yarn in the header band much more closely than is recommended for tabby setts in that yarn. But I persevered, fighting my usual tendency to beat really hard, and eventually got down to a workable thread count.
Tomorrow I get to finish putting the loom together and make a very long header band. Well, maybe start making the header band. I'm really not sure how long it's going to take me to make a header band for a project this wide, using techniques I haven't used often enough to be comfortable doing. I wish I could document having a tablet woven header band, but I can't, more's the pity. So I learn a new thing; that's part of the point of projects like this, right?
29 January 2012
Goalpost planted
In his Works and Days, the ancient Greek poet Hesiod recommended that a woman set up her loom and begin her weaving project on the twelfth day of the (lunar) month. The lunar month was counted from the first sight of the new moon, just as it is in the Jewish calendar, rather than from the astronomical dark of the moon as is modern scientific practice.
Accordingly, I have set 5 February of this year as my setup day, as 5 February is the next occurring twelfth day of a lunar month.
Today we got the loom wood. The clock is ticking!
Accordingly, I have set 5 February of this year as my setup day, as 5 February is the next occurring twelfth day of a lunar month.
Today we got the loom wood. The clock is ticking!
22 January 2012
Size matters
Today was the day to solve the loom size question. Mission accomplished.
First Greg and I sat down to work out the basics of how the loom should look and operate. That took some time because not all the period depictions look alike. We had to figure out a working set of assumptions based on our experience with building and weaving on upright looms. I'm pretty confident in the design decisions he made; after all, he's done this for me many times now.
Then I had to talk my patron out of expecting a piece three meters wide. I didn't confront the problem straight on, but took a more circuitous route. For one thing, I pointed out how wide all the looms were in the period depictions. Even the widest are not much larger than one person's "wingspan," as Greg put it. If there were ever a case of letting the correct tool lead us to the correct product, this will be one. But because I let the tool's innate logic speak for itself, I never had to hit him over the head (metaphorically speaking, of course!) in order for him to come around. Eventually, after he interacted with a physical sample of cloth in the correct size range, there was a very satisfactory meeting of the minds. So now he is commissioning a piece that is much closer to correct, Greg doesn't have to make a cloth beam so long it's structurally unsound, and I don't have to weave half again more cloth than I expected. It's all good.
Last night I acquired some more technical specs for extant textiles that include thread counts. I am really enjoying how the research process keeps turning up exciting facts that upend old assumptions.
First Greg and I sat down to work out the basics of how the loom should look and operate. That took some time because not all the period depictions look alike. We had to figure out a working set of assumptions based on our experience with building and weaving on upright looms. I'm pretty confident in the design decisions he made; after all, he's done this for me many times now.
Then I had to talk my patron out of expecting a piece three meters wide. I didn't confront the problem straight on, but took a more circuitous route. For one thing, I pointed out how wide all the looms were in the period depictions. Even the widest are not much larger than one person's "wingspan," as Greg put it. If there were ever a case of letting the correct tool lead us to the correct product, this will be one. But because I let the tool's innate logic speak for itself, I never had to hit him over the head (metaphorically speaking, of course!) in order for him to come around. Eventually, after he interacted with a physical sample of cloth in the correct size range, there was a very satisfactory meeting of the minds. So now he is commissioning a piece that is much closer to correct, Greg doesn't have to make a cloth beam so long it's structurally unsound, and I don't have to weave half again more cloth than I expected. It's all good.
Last night I acquired some more technical specs for extant textiles that include thread counts. I am really enjoying how the research process keeps turning up exciting facts that upend old assumptions.
18 January 2012
Shoring up the research
Right now I'm stymied on dimensions, so I'm working on other aspects.
Today I researched starting borders. I was delighted to discover something I've never seen before in my research. It's only a little thing, but it helps to fill in one of those "we don't know how they did that" lacunae, so it makes me happy.
I also contacted the supplier for one of the two yarns I'm considering. It's not currently available in the color I need -- still in production, but not in stock. Tomorrow the vendor is going to contact me to let me know how long before they have it back in stock. I've heard several people praise this particular yarn, so I hope I can work something out.
Tomorrow I'm going to start looking at selvedges -- or at least, look to see if there are any relevant selvedges.
This weekend Greg says he and I are going to go acquire what he needs to retrofit/remake the loom. Before that, we'll have to have a long talk about exactly how the loom needs to look and behave.
Today I researched starting borders. I was delighted to discover something I've never seen before in my research. It's only a little thing, but it helps to fill in one of those "we don't know how they did that" lacunae, so it makes me happy.
I also contacted the supplier for one of the two yarns I'm considering. It's not currently available in the color I need -- still in production, but not in stock. Tomorrow the vendor is going to contact me to let me know how long before they have it back in stock. I've heard several people praise this particular yarn, so I hope I can work something out.
Tomorrow I'm going to start looking at selvedges -- or at least, look to see if there are any relevant selvedges.
This weekend Greg says he and I are going to go acquire what he needs to retrofit/remake the loom. Before that, we'll have to have a long talk about exactly how the loom needs to look and behave.
Subscribe to:
Posts (Atom)


